

Suncircle Circular Light Mover
What is a suncircle?
Made by American Hydroponics, it is a 360 degree rotating light balancer. It will rotate a single lamp or lamps and even of mixed wattage and type over a crop profile in continuous fashion without flex getting tangled. The advantage it gives is a more even profile coupled with greater efficiency of the lights used. They come in three colors and three styles: Yellow, Purple, and Green.
As said, they come in three styles and they are the 1LRS (One Light Rotating System), the 2LRS (Two Light Rotating System) and finally the 3LRS (Three Light Rotating System). For the sake of this document, the discussion will be on a purple 3LRS.
Avoid the green model as it has a light weight yet weak chassis and can break away from the ceiling mount. I know this from experience. Chose the yellow or purple models as they can truly take the weight of low bays which means remote bays will be a cinch. I have used the yellow 2LRS and yellow 3LRS as well as the purple 3LRS with satisfaction. Although heavier to handle, the solid construction makes all the difference. It is vital that a suncircle has inherent structural integrity as lamps and a suncircle crashing down onto a crop below would be a disaster. The purple 3LRS is rated at 9kg (20lb) per arm load bearing.
It is equally important that it is mounted to a ceiling with sufficient load bearing. Check the joist or frame with a few chin-ups. If it can take that, then a suncircle will be safe to mount. Always over engineer in the construction of a grow room.
This document will also outline how to wire a suncircle, what a suncircle consists of as in components, their maintenance as well as ceiling mounting.
If considering the purchase of a suncircle, it will consist of the suncircle, a set of bull arms with extention arms, including low bay bracket mounts and cord with pulleys for the lamps. It will be expected that you use flex from your HID systems to set the suncircle up. That’s easy as this document will detail.
Note: The cord and pulleys that come with a suncircle are ridiculous. Far safer and easier to use chain with dog collar clips. You won’t get electrocuted as one should always wear rubber soled shoes in a grow room. It is after all a plant workshop and not a fun parlor.
Note: Suncircles do not come with male and female plugs for your hats. You must buy a pair of female and male plugs for each hat you wish to use with your suncircle. I will discuss this shortly.
Note: The extension arms that come with the bull arms have not been employed as I like to keep my light concentrated so the crop is full of solid bud. The extension arms simply slot into the bull arms and increase the over all arm stretch by double. Depending on model, suncircle arms can come in box aluminum or box galvanized steel. The ones shown in this document are aluminum.

Photograph showing clearance of a 3LRS suncircle on a ceiling grow room exhaust with bull arms pointing down. If one has a low ceiling without ceiling exhaust encumbrance, the bull arms can be positioned facing up, giving extra height on the hats to garden below. In either configuration of bull arm use, always make sure you secure bull arms firmly with the screws provided in the bull arm mounts.
Please note that all styles of suncircle will have different mounting plates so the holes on the plates will not correspond to the ceiling mount alignment you might have from another model. If so, then make a plate that will accommodate varied styles by lining up the plate at the hydroponics shop. This will give one the advantage of borrowing a suncircle from the hydroponics shop of purchase, if and when you have a problem with your suncircle for prompt garden installation and bearing you have good will with the hydroponics folks. You will note in this picture that there’s holes in this aluminum plate to accommodate three styles of suncircle. So make the ceiling mount with two plates. One set permanently to the ceiling that holds the fasting bolts and the other you can take to the shop for easy measurements.
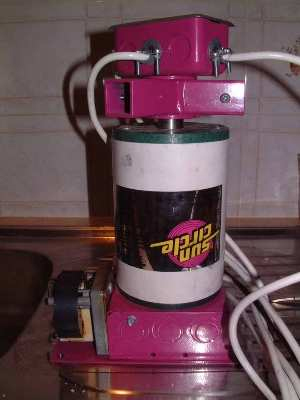
In this picture, the suncircle is fully wired and flex attached. Short of being ceiling mounted, bull arms attached and connected off to hats/ballasts and with the power on, it is fully operational as can be seen in this photograph.
Please note, that the suncircle is actually upside down, as the ceiling mounting plate is sitting on a tiled floor — so imagine that the tiled floor is a ceiling. You can see the black cord that brings power to the the suncircle motor. Note the three flex cords on the junction box located near the ceiling mounting plate for the HID ballasts and the three flex female plugged lines from the other junction house for the hats.
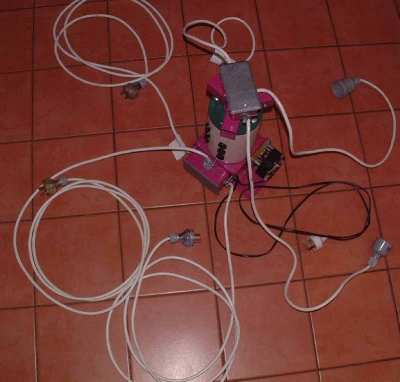
A closer look at the suncircle and again without the attached bull arms. It’s actually the other side of the suncircle not seen in the first photograph. For the sake of ease to photograph, the suncircle is again upside down with the ceiling mounting plate resting on a kitchen sink. Note the two junction houses, electric motor, brush points, ceiling mount plate, bull arm mounts with securing screws and flex for lamps and ballasts which lead off from the two junction houses. I will discuss these shortly.
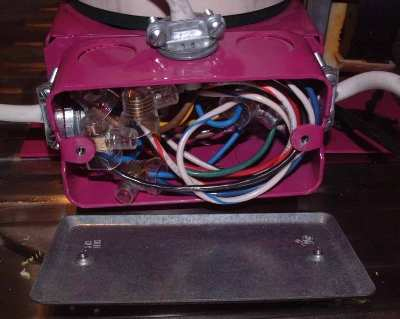
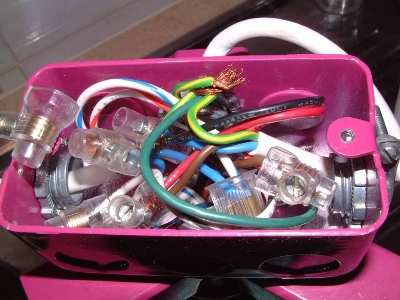
A close look at a junction house with junction housing plate removed. This junction house is the one that takes the flex from the ballasts. It is identical in wiring to the junction house that takes the flex to the hats.
It is a good idea to write in indelible pen at each flex entry point what station it is. In the case of this 3LRS, there’s three stations per junction house. Not only will this make it make it easier in the wiring of the suncircle, it will ensure that the two junction houses are identical in all regards.
Ensure that the flex is held secure with the suncircle junction house clamps as seen in the photograph. You want no wires inside junction caps coming lose from flex being pulled due to insecure hold as that can cause short circuit. I will discuss wiring shortly.
The suncircle with ceiling mounting plate removed exposing the interior mechanics in relation to the external electric motor.
Note: Because a suncircle has to be taken down so you can inspect and lubricate the inner workings, you must set the suncircle up in your grow with intention that it will come down in an ongoing basis. So think carefully on how you will ceiling mount it. It may seem silly to say, but do not for example, set it so the nuts to the mounting bolts can only be accessed from the crawl space of a roof. Always have the nuts on the bolts facing downwards to the grow below.
It’s simply a drive shaft from the motor to a central cog which in turn rotates the central core. It is advisable every twelve months to take the suncircle down and remove the ceiling mounting plate and grease the drive shaft and the central cog. This can be seen in the photograph with an evident blue residue of fresh grease. Ordinary automotive grease is sufficient.
Note: When in operation, do not force the suncircle. Doing so can cause misalignment of the drive shaft to the central cog which will result in the suncircle not rotating.
In this suncircle shown, one garden rotation happens every 4 minutes and 20 seconds, so a little patience is needed if a hat happens to be in the way when inspecting a plant.
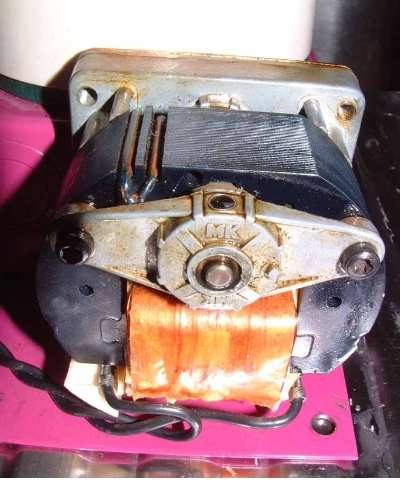
A view of the suncircle motor.
Note: It needs an oiling every month and you can see the oil well on the side of the motor. Sewing machine oil is sufficient. Just a few drops is all that’s needed.
A look at the brushes of the suncircle. Note: Some people refer to brushes as bushes. Simple to remove with a flat head screwdriver from the brush points.
A closer look at the brushes.
Being that the rectangular prism is copper it will wear out before the central core will and this is intentional in design so the suncircle has a long working life. Brushes are cheap but a worn core equals a dead suncircle. However, it is advisable to inspect the brushes along with your once every twelve months check. Give the brushes a light sanding on contact end if dirty from carbon. This will ensure that there’s adequate contact so circuit is effected.
If ballasts are in working order as well as lamps and you note lamps failing to charge or failing to fully charge and your suncircle wiring is correct, it may be poor contact with a brush.
When needing to inspect a suncircle or taking down a suncircle, you must switch off all HID’s with allowance to five minutes discharge time for the HID capacitors. That will not only insure a sound working life of the capacitors, it will prevent potential electrocution. Then pull the HID plugs from the wall as well as the suncircle motor plug. Now it is safe to inspect the brushes. A suncircle with i.e. 3000w of HID is not a toy and it can deliver a lethal electrocution. Treat all use of a suncircle with care. If the brushes appear in working order, then you will need to take down the suncircle and inspect the junction houses for possible lose wires. If all appears normal and you know for a fact that your ballasts and lamps are in working order, you will have to take the suncircle back to where you bought it for service. Only a qualified electrician should service a suncircle.
Once having purchased a suncircle, you have two choices. You allow the shop to wire your suncircle or you do it yourself if you have no problems with some basic DIY sparky work (electrical work). Doing it yourself brings several advantages.
It can save you some money by not shelling to a hydroponics store technician.
You can get on with your project immediately.
You will become familiar with how the suncircle operates.
You will be confident to attend to minor trouble shooting yourself.
You will be able to cut the flex to exact lengths based on what lengths are needed in your grow room — a task not easy to do when in a hydroponics shop. The less length in flex from suncircle to ballasts and suncircle to hats the better, as there’s loss to resistance in circuit in excessive flex.
If you do decide to wire it yourself, you must do so correctly. One must ensure that all wiring to the two junction houses is exact to both junction houses. Failure to do so will cause a short circuit which could not only damage the suncircle, it could damage the HID ballast and lamp. A very costly mistake to make. Fortunately correct wiring is a simple task of following exactly a chosen color combination of the wires inside the junction houses.
Now it would be pointless showing each and every wiring step of colored wires in sequence, as it would simply be a series of photographs of confusing “electrical entrails”. So a text worded description is best.
The following example is how I wired this suncircle. In this example, it is a 3LRS and in lesser armed suncircles, there’s simply less wiring to do. The only important issue, other than ensuring all wiring to both junction houses is identical, is that the earth (green wires) is all set to the one junction cap. Green is always earth.
Note: All wiring is to be held by junction caps of approved safety standard. The junction caps that came with this suncircle were inferior and I replaced them immediately with what you see, which meet ASA in Australia. This is most important as wires coming lose from junction caps when suncircle is in operation could cause a disastrous short circuit.
When wiring, strip back 7.5 cm (3 inches) of outer flex insulation and 1.5cm (2/3 of an inch) of inner core insulation. It should come with your HID kits.
Note: If in the case of a 3LRS as this one is, you will need 14 junction caps.
Lamp 1.
Blue wire to Black wire of suncircle.
Brown wire to Red wire of suncircle.
Lamp 2.
Blue wire to White and Blue stripe wire of suncircle.
Brown wire to White and Red stripe wire of suncircle.
Lamp 3.
Blue wire to Blue wire of suncircle.
Brown wire to White and Blue stripe wire of suncircle.
All green wires joined to one junction cap.
The above is repeated again exactly in the second junction house.
You could chose any other combination of colored wire to colored wire, as long as both junction houses are identical in wiring and again at risk of repeating, that all green wires are always to one junction cap. It’s also probable that the colors that I’ve spoken of will vary, as they did in my experience on 2LRS and 3LRS yellow models. No problem, just make sure both junction houses are identical to the color code you chose.
Looking at the photograph provided, you can see the green earth is four wires in total with the junction cap taken off to demonstrate. The fourth green wire is the suncircle earth as the three green wires are from the three HID flex.
Aside how the suncircle is ceiling mounted, it should also be center of your grow footprint. The old 3,4,5 math will do that. That is, 3 squared plus 4 squared equals 5 squared, which will give you a right angle so you can footprint section a square from a rectangular room. Then suspend a plumb bob at central point and you will know the central floor point if needed i.e. to square out where the reflectors of your grow will go.
Equally important is making sure that the suncircle is level in mount. Simple tighten or loosen the bolt nuts on the ceiling mount plate till level. You can if unsure, inspect with a spirit level by laying it across the bull arms. This will ensure that there’s no strain placed on the suncircle motor when system is in rotation.
Another view of the suncircle ceiling mounted and now awaiting the hats to be attached. Use cup hooks to tie off the ballast flex to ceiling and position the hat flex on the bull arms.
As seen in the photograph, it is a wise idea when attaching and wiring your flex to the suncircle to use female plugs from the suncircle and male plugs from the hats. This allows fast removal and setup of your hats. Often times suncircles on display in hydroponics shops will not have female and male plugs set on suncircle to hats. That’s perfectly fine for a shop display, not very practical for growing operation.
I will repeat stating this important point. Always use female plugs from the suncircle and male plugs from the hats or risk electrocution by errant contact to active male points. Use common sense.
Equally important, if using a mixed lamp configuration of Metal Halide and High Pressure Sodium and/or different wattages such as 400w and 1000w, always mark clearly with an indelible pen on the female plugs from the suncircle which are which. That way you will avoid plugging in a hat to the wrong ballast.
I’m in St. John’s Newfoundland Labrador Canada.
Interested in purchasing a couple of Sun Circles.