

Grow room layout
First, the lamps are installed. It’s important to ensure enough power capacity. The three lamps together require 1200 watts of power, while the pump and the ventilator also draw current. The safest manner is to allow a separate circuit in your tool cabinet. With a 16-ampere circuit, you have 2800 watts at your disposal. The circuit does provide more power than that, but you cannot use it all. When the lamps are turned on, they use more power than the 400 to 600 watts they give off. Too high a current drain will blow the fuse The lamps must be distributed so that the entire growing surface will be evenly illuminated.
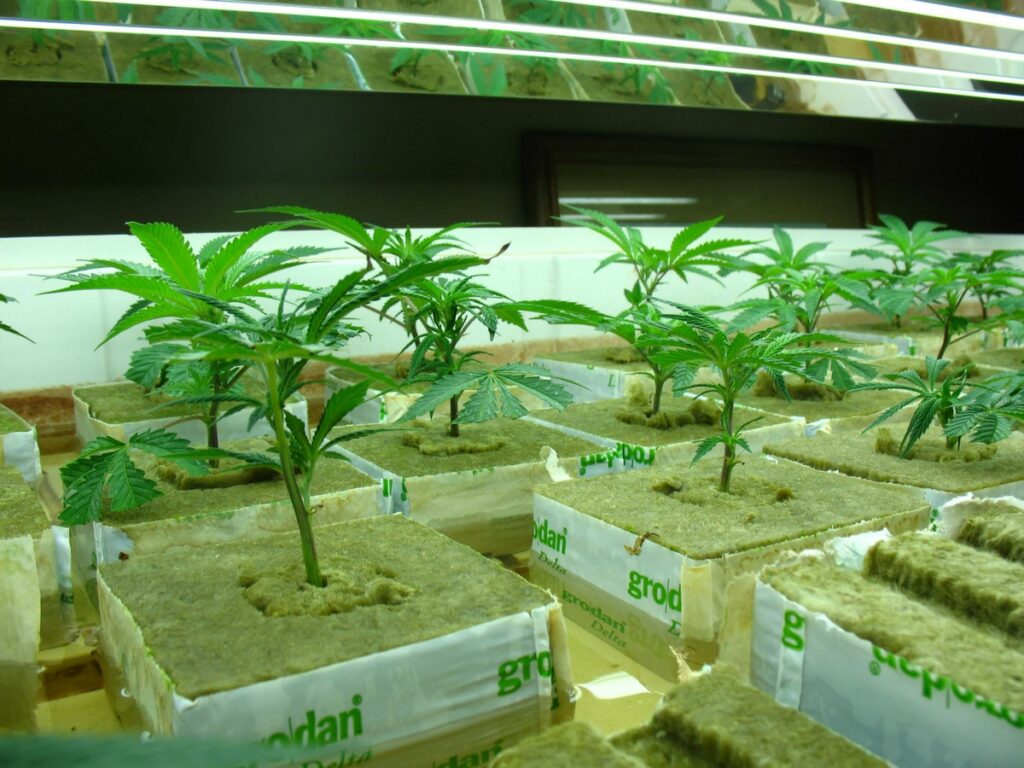
It’s a good idea to build a wooden frame to hang the lamps, and to hold the libra-trays. Other devices can be fastened to the frame later. Second, the libra trays are arranged. libra trays are well-suited for growing indoors, because they provide drainage for water run-off. We can also use so-called drainsets. These should be assembled first. When they’re assembled, they can be snapped onto the trays. If you don’t have access to a drain, it’s wise to build a drainage tank. As an alternative to libra trays, you can, of course, use ordinary pots. If you don’t want to use drain sets, you can drain water via gutters. The growing trays are filled with rockwool slabs. Holes are cut into the slabs for the rockwool blocks. The blocks are fastened to the slabs with pins. The rockwool blocks are saturated with water and fertilizer. After laying out the irrigation system, the rockwool slabs are then cut on the underside in order to allow excess water to drain. We’ll set up the irrigation system. First, make an electrical outlet (earth ground!). The outlet should be conveniently located, right next to the fertilizer tank. We’ll put the fertilizer tank just next to, or even underneath, our grow-table(s). The immersible pump is placed in the fertilizer tank to pump the fertilizer to the plants. The pump is turned on and off by a timer switch. This way, we make sure the plants get their water and nutrients on time. A tube is attached to the pump. This tube is connected to a flexible polyethylene hose. This polyethylene hose is suspended over the middle of the libra trays. The end of the hose is sealed with a cap. Punch holes for the sprinklers. The next step is the installation of an air pump with an aerator. The aerator is placed in the nutrient tank so algae won’t grow so rapidly. The air bubbles generated by the pump and the aerator take care of that. This way, you also insure that sufficient oxygen gets in the water, and that the fertilizer components remains in motion. Next, put a heating element in the nutrient tank. The element has to maintain the water temperature. To be able to check the temperature, we place a thermometer in the tank. Watering can now begin; the nutrient tank may be filled with water and the proper amount of fertilizer. Pay attention when you mix the fertilizer. Follow the directions on the package accurately. They describe the correct amounts of fertilizer to apply.
With too little feeding, the law of minimums comes into play; delayed growth and flowering; unhealthy plants. With over-feeding, the plants will burn . When you apply various kinds of fertilizer (also called A- and B-nutrients), make sure the materials don’t make contact with each other. If that happens, then a chemical reaction occurs between the phosphate in the one, and the calcium in the other. Calcium phosphate forms, and the fertilizer loses potency To find out whether or not the fertilizer you’re using has the right concentration, we use an EC meter (see the chapter about water). With too low an EC measurement, you should mix in more fertilizer. With too high a reading, you should dilute the solution with more water. In addition, the acidity of the water – the pH value – is important. We measure this with a pH meter (see the chapter on water). When the pH value is too high, we can lower it with saltpetre/phosphoric acid. When the pH value is too low, we can raise it with a solution of calcium carbonate. You must be very careful with concentrated saltpetre/phosphoric acid. It will burn holes in your clothes, and it will seriously burn your skin, too The irrigation system is now ready to be tested. Always make sure the water pump is never turned on in the absence of water. This can burn up the pump’s motor. Place a sprinkler in one of the measuring cups and determine how much time it takes to pump approximately 50 cc of water and nutrient into the measuring cup. Program this time into your timer. It’s intended that each plant gets around 300 cc water and fertilizer, divided over at least 6 feeding times. If you have a timer which can be switched on and off more often, then you can spread the 300 cc over more feeding times. As an example, we’ll consider 6 times. The first 50 cc feeding is given at the moment the lights are turned on, and the last, two hours before the lights are turned off. The other four feedings are neatly divided, via the timer clock, among the periods in between. Plants take in water and nutrients only under the influence of light. This is the reason for giving water and nutrients when the light is on. The last feeding is given approximately two hours before turning the lights off; in order to give the plants the chance to absorb the water before the dark period. The quantities we refer to in this book are average values. The starting point of every grower must ultimately be raising healthy plants. So you also have to have green fingers as you do the watering and feeding.